
Putting up a stylish red retro industrial On Air recording light outside my YouTube studio together with an illuminated on off switch! I walk you through the process of choosing the vintage bulkhead light, and then fitting it to the Happy Hut... connecting it to a 22mm illuminated 240v mains latching switch to turn the on air light off and on again. I also try to explain why I'm obsessed with studio recording and transmission lights, like the ones at BBC Television Centre in its heyday.
Retro Bulkhead light BUY ONE HERE!
As an Amazon Associate I earn from qualifying purchases.
Illuminated latching on off switch!
My YouTube studio transformed by THIS!
TRANSCRIPT: (CLICK PLAY ON THE VIDEO ABOVE)
THIS IS THE TRANSCRIPT - CLICK PLAY ON THE VIDEO ABOVE!
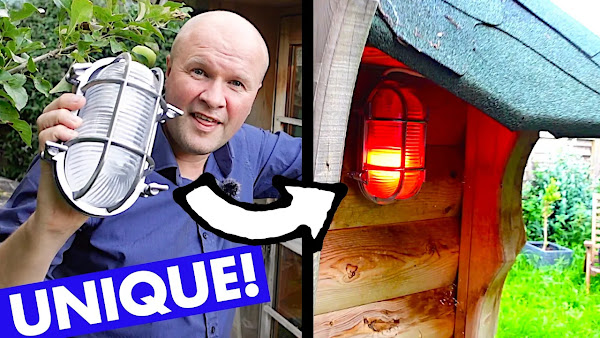
Hello, I'm Neil. Welcome back to the channel, and welcome back to the Happy Hut because this is a really, really big day for the Happy Hut. This is how it looks right now, and this is how it looks in the future. I obviously can't see this; I've edited this in. I am putting up a stylish red recording on-air light outside the door of the Happy Hut. We can see this right from the other end of the garden, and it can go on when I'm recording or going live. Then when I'm done, I can remotely switch it off, which means this lovely on-off switch which controls the on-air light and it lights up when the light is actually on outside. That footage is from future me; this is how it looks right now.
I really do not know where to start. I don't know if you can see the spider's web in there. Now, I want a light to go here, partly to look cool, but mostly it's for the rest of the family. They don't know whether they can come in or not while I'm working in here, so they just kind of hover out here. It's annoying for them, but I absolutely love TV and radio Studio on-air lights. This is from my student Radio Days. Look at the state of that. I don't want it to look like that;
[ME IN 1994] “It's a mixture of news and specialist speech...”
And I don't want it to look like that!
I have seen some really good professional signs, but the mother of all on-air lights was, of course, the ones at BBC Television Centre. They are absolutely beautiful. Look at them. I love how it doesn't say "on air" or "recording"; they have really big words on there: I love those whole words... rehearsal, transmission, audience entrance.
I don't want words on mine; the on-air or recording signs you can buy online are absolutely abysmal, ugly, cheap-looking, badly made. They just don't look real at all. Instead, I'm buying this; it's a bulkhead light. I'm kind of going for the look of an industrial workplace. So even though my love is for TV and radio, I think this is more of a movie studio warning light look. I'm putting a link in the description to this type of light; it's called a bulkhead light, and you can see that the way that you get into it, it's completely waterproof and weatherproof, and it has these bolts on the sides. If you unscrew these bolts, you can open up the glass and the protective cage, and there's a really standard light fitting in there.
The biggest question for me right now is where exactly to put this. I'm going to have... there are bolts for the cable to come out the top, and that's completely weatherproofed, I don't know what you call it, a grommet, it's like a rubber thing in there. I think I really want it this way up, but I don't know whether to put it here; you can kind of see it better, and the roof doesn't block the view of it, but it looks much tidier higher up, kind of tucked under the roof. It means that the cabling will be a lot tidier; I won't have a big cable running down the middle of the wall here. You can still see the light from the end of the garden, and the whole thing just looks a lot tidier.
The cabling is going to run underneath this; it's like a gap between here, it's like a false panel. I don't know if this is going to be a permanent solution, but the cabling, I've got an idea for the wire to use for it, just to get it up and running.
Hey Joe, can I ask a favour?
This is like an extension lead here? Thanks.
I'm going to take it apart and permanently destroy it. I am going to use this 5-metre extension cable; I'm going to completely take it apart and use the plug and the long lead to run through the Hut and out to the outside to the bulkhead light. I've looked at buying some cable from Amazon, and it's almost cheaper to use the extension lead and cut off the plugs from the end.
I just trod on a wasp, and oh man, I had bare feet. But it's never easy, is it?
Here's the time-lapse now of me putting the bulkhead light up into position and screwing it into place. And then I'll have to figure out how I deal with the cabling. I think before I can put it up, I now need to sort out the wiring. So, let's take down this, and we'll get some cabling behind it. This turns out to be a lot harder than I think it is. I don't know why - the screws haven't been moved in five years since the Hut was built.
I'm now using my drill as a screwdriver, plus, and I'm in a bit of a heightened state because of the wasp-sting. But what is that down there? Some kind of bug pupa thing. I have had some wasps hibernating in the Hut, and I see them in June trying to get out the window. I wonder if this one was left behind or whether that was the, uh, the thing that it grew in.
It's the next day, and my foot is better, thank you for asking, but still swollen, still hurts from the wasp sting. I'm gonna power through it and take my mind off. I've never drilled an actual hole through the skin, through the walls of the Hut. I'm a bit anxious about this, but there's, there's no way around it. I've just got to take my best guess and hope that it's not going to go wrong. I'm removing this wooden panel first to make it easier to drill into the wood, and I'm drilling into the exact place I want the power cable to go, trying to make it dead centre of the panel so that it will hide the wires.
Well, it's gone through something, but what has it gone through? Let's have a look out here, please, please, please. I don't really want the wire showing on this side. Okay, it's through again. It's going to be Swiss cheese by the time I finish with it. Let's go outside. oh saved by the Bell. Ah, great. So the hole is just too far to the right. Okay, the problem I've got is that this is the furthest right I can have the cable because of the panel, but it's too far to the left. So if I do another hole and try and put it in a funny, wonky angle, maybe that will work. Third time lucky, but where did it end up? Let's have a look, come outside.
Perfect. Oh, it's kind of overshot a bit too much. I could have gone that way, but that's good. Ow, that looks perfect. Okay. Well, it's designed to last, so these are nice long pieces of lead. Cut them off; that'll save me having to strip them. Now the cable is through. I can, it's kind of in the right place. I prefer it a bit further on the right, but I'm just happy to have some power cable out here. All I need to do now is wire it up into the bulkhead light fitting.
This takes me a bit longer than I planned. It's a bit fiddly, so I'm taking a nice sit down and just enjoying the process. I'm not enjoying the process. We are powered up, cabled up, good to go, I think. So I just need to feed the cable back into the hut so that it'll be nice and flush.
Now it's time for the moment of truth. Let's go into the hut. I'm going to put the bulb into the bayonet and just screw that in nice and tightly. But I don't know if this is going to work, so let's plug the other end in. Oh, please work, please work, please work. Whoa, yes, stage one complete. And I'm hoping I can see this from the path down the garden. Yeah, you can definitely see that. Okay, this is good. This is good. So we go to the next stage, which is to sort a nice switch out. This is a 240-volt Mains AC on-off switch that I'm hoping will light up. So you push it in and out; it's like a toggle switch, latching switch.
But to tidy this up, I know that it works now, so I can tidy up the wooden panel, and for that, I think I just need to do the reverse of what I did before. So I might give it a little Hoover, little vacuum, and then straighten the cord and try to get the screws back into the original holes. It was a bit of a bish-bash-bosh job. I can hide everything with pulling that shelf back on. By the way, this is what it takes to wire one of these switches. It's... the state of the place! It's been so difficult to wire up just this tiny switch.
Now it's the really tricky bit, the bit that could damage the whole Hut. I need to drill a hole in this so that the switch can sit through. So there's no going back; once I drill this hole, it's so huge, the button's just got to go in anyway. I'm laying the sheets down so that I can protect the board of wood, and it's nearly sunset. I really want to get this done before it gets dark, but I'm using this spade drill bit. It's the exact width or diameter of the switch, and it's just started raining. I've got to be really quick.
All right, I think that is pretty perfect.
It's exactly what I wanted. Let’s get back to the hut before it gets dark and rains harder. Ah, look at that, fits almost exactly. So, I didn't check the width of the wood, um, it's too thick for the washer thing to go on. Oh, this is so tricky. I could just butcher the wood to just cut some more out, and then this is what holds it in place. I could fill it with hot glue from a hot glue gun.
It's the next day, it's a lot sunnier in the garden, and out comes the inevitable white cloth to protect the board yet again as I deface it, start pulling it apart again. The poor thing, what is it going through? This is me chiseling at the back. I've marked out an area that I hope, the kind of wing nut, not wing nut, what you call it, it's just a nut that goes on the back and screws in to hold the button in place. I've kind of guessed how much space I'll need to turn it round, and I've kind of guessed the depth as well, but I've got halfway and we'll see how much more I'll need to chisel off.
This is now how we're looking. Let's see how far we've gone. Here is the button causing all the problems. Let's push it through. Oh, actually, that's looking quite proud. So if I can just, all I need is one ring of thread to be able to, no, I've got to go further. My biggest worry now is if I use a bigger hammer, is I do not want to smash the front of this single original piece of wood. I do not want to crack or go through this. So, probably another few millimetres down. I'm kind of sick of the chiselling by now. I'm not very good at chiseling. I don't have a good technique and I could definitely do with a sharper chisel as well.
But let's just keep going with this and see if I can bring it down to the right depth. Okay, now this is looking a lot more promising. Can I get this washer on, or nut or whatever you call it? And look, it's perfect. Okay, we're good. We've done it, and I think I'm going to move the screw that was there. It would just look ugly and confusing so close to the light switch. So I'm filling up the hole with some wood filler and hoping that I can sand it down and it will just blend in. But I think even with the filler there, it will just look better and flatter than with having the screw hanging out.
Now I'm doing something that I've not done before, and that's some basic cable management behind the panel to move the big cable to the side so that the switch has lots of space behind it. And then I'm going to pin the cable for the switch in the right position. By the way, this is how the loom works. This is my wiring. I wouldn't copy my wiring. I would follow the diagram on the Amazon page.
Now the very special moment where I can attach the loom onto the back of the switch. Make sure it clicks and the switch is holding, and then I can screw this panel back to the wall. Everything is tidy. I think we might be ready to go. It's time now for the moment of truth. Let me turn some lights off. Let me turn this light off. Pan the camera over to the switch. Here we go.
[Music]
[Music]
It works!
It works! I did it! I love it! I absolutely love it!
I've only got one more thing to change.
Previous post...
Taking an easy free online hearing test
All about me, and getting these by email.
No comments:
Post a Comment
Hi, thanks for leaving a comment - I really appreciate it!