How do you make a new Google Account? I show you step-by-step how to create Google account using a desktop or laptop, or only with your phone and a web browser, for Android or iPhone or iPad. This tutorial helps you with the fastest ways to open and activate Google Account however you want.
How do you delete a YouTube video? That's a video that you have uploaded to YouTube, either by desktop or using your Android phone, iPhone or iPad? In this step by step tutorial, I show you how to remove a video and this also works to delete YouTube Shorts videos! You can remove your video from YouTube using just the regular YouTube app!
THIS IS THE TRANSCRIPT - CLICK PLAY ON THE VIDEO ABOVE!
Hello, how do you delete a video on YouTube?
That's a video which you have uploaded and you now want to remove permanently.
You probably know this already, but you can hide, unlist, or edit videos that you have put up on YouTube.
The links for how to do those are down in the description.
The easiest way to delete a YouTube video is to use the YouTube Studio app or go to studio.youtube.com on any browser.
But maybe you don’t have that app. OR you’ve only got your phone to do this.
Let's do this both on desktop and phone.
To delete a YouTube video using a desktop or laptop:
Open the video you want to delete.
Make sure you're signed in on the correct YouTube account, and this button should appear: "Edit video."
Click on that, and it takes you to the studio page for the video.
Click on the three dots on the top right-hand corner, and there's the option to delete.
You get this warning message; check the box and delete forever!
With Android phone, iPhone, or iPad, we can delete a video on YouTube using the regular YouTube app:
Click on your avatar, that's the picture of your face, in the bottom right-hand corner.
And then, scroll down to your videos.
These are all the videos that have been uploaded, even the ones which are private.
And I’ll click on the three dots next to the video that I want to delete.
That brings up this menu; scroll down, and there it is: "Delete." We did it!
If this video is helping, thank you for hitting the thumbs up or the Subscribe button; it really helps me out, so thank you. And right here are all my other amazing YouTube Creator tips and tricks. Can you please help my dad get to 1 million subscribers? Just click on his face. Thanks, bye. Can we have dinner now?
How do you turn off the Apple Macbook startup sound? In this video, I'm sharing how to stop the Macbook opening sound for a Macbook Pro, Macbook Air, M1, M2 or who knows... M3! It's all in the Macbook system settings, under the "Sound" tab to turn off the start up chime.
This is our BEST dehumidifier from Amazon from all the reviews: the MeacoDry Arete One 18L dehumidifier and Air Purifier. This is a full review of the low energy Meaco dehumidifier. It is also very similar to the 15L, 20L and 25L dehumidifiers, but this model seems exclusive to Costco. I show you where we place this dehumidifier in the room or bedroom; how much it reduces humidity and mould in our house and for drying clothes; unboxing and first impressions reviews; and how to use the Meaco dehumidifier control panel. It was easy to follow the instructions which I share step-by-step in this video, with review of the Meaco Arete One at the end.
THIS IS THE TRANSCRIPT - CLICK PLAY ON THE VIDEO ABOVE!
We have had this Meaco Arete One dehumidifier and air purifier for over a month now, and we absolutely love it. I'd even go so far as saying this is the best dehumidifier that we can find right now. I'm going to show you everything about the Meaco Arete One: how it comes out of the box, how the control panel works, plus where we've been using this dehumidifier around our house. I'll give you a full review at the end of the video because the new thing I'm trying to make your family happy is this Meaco Arete One 18L dehumidifier and air purifier. For us, we're not rich, and this seems like an insane amount of money to spend on anything, let alone something that just sucks water out of the air. But we've got a really big problem with mold around the house. Here's some footage of our greatest mouldy hits. We've got it everywhere. Here it is in the hallway behind the coats. I put up these boards to make the walls warmer, and now they just get covered in mould. I even found some behind the brand new benches I was building in the kitchen. There's a whole video about this down in the description. I'm using Milton sterilizing fluid around the house to kill the mould spores and clean up all the mess that it leaves.
As you know, if you're looking up this video, the mould just finds the coldest parts of the house, wherever they are. The water vapour in the air condenses, and mould grows in those cold places. The worst patch that I found in the house is right here on the ceiling of my daughter's bedroom, and that's when I made my last dehumidifier video. It's a small budget one for under $80 or £80; there's a link in the description, and it works really well directly collecting about a litre a day in the bedroom.
But I know that we need something much bigger, a more major solution to bring down the humidity in the house.
I bought this relative humidity meter on Amazon and put it up in her room.
It has gone up to 83%, and the advice from the health executive is that it should be around 30 to 60%.
So, because of that and the mould, we know that we absolutely had to buy this: the Meaco Arete One 18L dehumidifier and air purifier.
We saw it purely by chance in our nearest Costco; the dehumidifiers were all sold out last year on Amazon and John Lewis here in the UK.
We saw it on the shelves, and money is really tight, but I don't think we could face another year of cleaning mould off our coats and walls.
What else could we do?
Well, I... I did not think we'd pick up a humidifier today, a dehumidifier.
We came in for some lemons!
So we bought it!
I can say it is without doubt the best thing we have bought this year.
I'll give you a full step-by-step review at the end of the video, but this is how much water we are removing every half a day.
Look at all of that every 12 hours; that container fills up, that's about 5L.
The house feels drier and warmer within about a day of plugging it in, and it removes a lot of water from the air in the first week.
We think it might be drying out the whole house: the walls, carpets, gaps underneath the house, and between the walls.
The place just smells better, and it might be in our heads, but our home definitely feels less damp.
Let's open up this bad boy.
This is the Meaco, the MeacoDry Arete One!
And Meaco have called their brand "Meaco Dry," which I've not heard of before, but I love this "Excellence in all things."
They've even given themselves a Japanese-style overblown sentence of a mission statement because this is actually made in the UK.
Well, no, it's not made; it's designed in the UK. It's made somewhere else.
But we've got a nice Union Jack there. Let me give you a quick spin around the box so you can see exactly how the Arete One 18L dehumidifier arrives.
The box is quite stylish, isn't it?
It feels quite heavy, quite substantial.
I'll put the weight of this particular unit on the screen now.
Here we go.
We're in the UK, so obviously it comes with a UK plug.
And there is a pack of, oh, look, there's a filter that comes with it. We'll have a look at that.
It says it's a free HEPA filter.
And then there's a bag of instructions.
It's quite nicely presented, but oh Meaco, come on, how big is that text?
That must be only 10-point text.
It wouldn't kill you to make the instructions bigger, would it?
The sides are taped up so that they don't fall off, so we'll pull these bits of tape off for our first impressions unboxing.
And then, at the top, there's a sign here:
"The handle is below this label. Please lift the handle by pulling upwards with one hand at each end,"
Which means... I can demonstrate it one-handed because I'm holding the camera.
You kind of lift each one at the same time, and that's your carry handle there.
That's quite sleek, isn't it?
Oh, I'm not sure I want to lift it, though.
So that's a nice touch.
And then we have the control panel, which is flush and all wipe-clean.
If I use the handle to tilt it up slightly, you can see the roller castors underneath.
I don't want to lay it down because I don't want to scratch it, but there are four castors, so it should glide across most floors.
Let's turn it around.
This looks like a really well-built, substantial unit.
I really like how it comes out of the box.
It looks good.
Here's the, I guess, this is the bin, is it, for catching the liquid, and helpfully, there's a circuit diagram in there.
That's very... That’s very thorough, isn't it?
I won't be consulting that.
The power cable, the cord.
Let's get that out. See how long that is.
It looks like it's about 2 metres. Yeah, I'd say it's about 2 metres long.
Very generous.
And there's this cord storage thing that you can wrap the cable around when you are storing the dehumidifier.
At the back, oh, this slides out.
Oh, look at that.
So, I guess this is the element.
I've opened up the HEPA filter, and I'm going to put this into, I guess this is the filter holder.
I haven't read the instructions yet, but I'll put on screen if this is wrong, and then you slide this in.
I guess there's only one right way to do this, and that clicks.
So the filter is held in place.
There's a user-friendly display, one-touch ease of use, contemporary controls.
It's sleek and unobtrusive.
The side air intake allows the dehumidifier to sit discreetly against the wall.
It looks like Eva from WALL:E to me!
You can easily clean the filter from the side without moving the unit. There's a cable tidy to keep wires out of the way and tangle-free. A hidden handle for sleek lines along the top.
There's a large window which lets you see the water level really clearly.
Water can be emptied from both the left and right-hand sides.
Oversized ergonomic handles make it easy to remove the water bucket, and castors underneath are hidden behind feet that help the dehumidifier blend into any room.
Let me show you how the control panel works.
If you're thinking of getting the Meaco dehumidifier, it will give you an idea of the different things you can do with this.
It looks complicated, but it's simple once you've used it a couple of times.
This is how the control panel looks for the Meaco dehumidifier.
To turn it on, obviously there's a power button here, and it says 52.
That means that the relative humidity at the moment in the room is being sampled at 50, now 56...
The numbers are jumping around because the dehumidifier is sampling the air.
I think it does this for about 10 minutes, so the reading on the display here will jump around for a bit while we get the dehumidifier started.
The most important button on the... on the whole unit is this button here with the icon showing a drip.
This is called the smart humidity mode button.
By the way you can probably hear it in the background: I hope that's not too distracting.
This button is crucial because this is the reading of the humidity in the room at the moment.
If I press the smart humidity mode button once, that enters smart humidity mode.
And in this mode, the dehumidifier will default to a target humidity of 55% relative humidity and a low fan speed.
So if I press it again, that shows you that the target humidity is 55%.
Once the target of 55% has been reached, the dehumidifier will stop, and every 30 minutes the fan will kick in to check the humidity level and the dehumidifying indicator will turn off.
I think that's this light here.
Night mode can be set while the dehumidifier is in smart humidity mode by pressing guess what: this moon icon here.
This is the night mode button. If I press that, I'll just show you what it looks like and I will explain it properly in a minute, but the light comes on, all the lights go off so that you can get some sleep and you haven't got blue lights in your room at night.
The fan speed - you probably can't hear it - I tend to not notice it - but in night mode, the fan speed will be reduced to low.
The buttons won't bleep when you touch them, so if I press this one, you can see it’s... or hear that it's silent, and all the lights on the display will turn off.
Let's take it off night mode by pressing the night mode button.
If I press it again, you can see the light flips over to the smart humidity mode.
We can set the dehumidifier to reach a target that isn't 55%.
All I need to do is to keep pressing the smart humidity mode button, and you can see that it cycles through these different relative humidity percentages: it goes 40 all the way up to 70.
If I press it again, it goes to CO.
CO stands for continuous, so it won't have a target humidity to reach; it will just keep running come what may.
If I press it again, let's set it to something like the default 55%.
Once you've set the desired target humidity, it shows on the display for 5 seconds, and then it changes to the current humidity level that it's reading in the room.
The great thing with this mode is that once it's reached the target humidity level, the dehumidifier will stop.
If I go back to the smart humidity button and hold it down for 2 seconds, AP shows on the display. That stands for air purification mode.
Now air purification mode means that the dehumidifier has turned off (so that light has gone off and the air purifier light has come on).
The unit is now just purifying the air, and I can feel that it's a nice jet of cool air coming out.
It's not dehumidifying, so this might be useful in the summer months when we don't tend to need to dehumidify the room.
To take it off this mode, we just hold down the smart humidity button for 2 seconds, and it goes back to dehumidifying the room.
By the way, if this is helping you, thank you for hitting the thumbs up button! Let's see some more.
The thing with the air purifier is that it's always air purifying.
It's always purifying the air, either with the dehumidifier or without the dehumidifier.
The other big button is this button here with the T-shirt icon on.
Should we press it? Let's press it.
You can see 35% appears.
This is Smart Laundry Mode.
When it goes into Smart Laundry Mode, the dehumidifier defaults to a target humidity of 35% and a high fan speed.
I can definitely feel that with my hand right now.
Smart Laundry Mode runs for 6 hours. So, if I press the T-shirt button again, the Smart Laundry button, this shows SL, that it's in Smart Laundry Mode.
If I press the T-shirt button twice, this shows the number of hours left for the Smart Laundry Mode, so this “06”, that six there means there's 6 hours remaining.
And obviously, it'll count down all the way down to zero
If the dehumidifier reaches a humidity level of about 32% before the 6 hours is up, the compressor turns off to stop the air from becoming too dry, but the fan does continue to run.
We can put the dehumidifier into Night Mode even though it's in Smart Laundry Mode.
Naturally, we'll just press the Night Mode button, and the fan speed is now reduced to low. The buttons won't bleep, and all the lights on the display will turn off.
So, now we're back into the regular dehumidifying the room mode.
Child Lock is the Night Mode button here.
You can see there's a little picture of a lock beneath the moon icon.
If we hold down the Child Lock button for 2 seconds, and it just means that you can't interfere with it by pressing any of the buttons.
To turn off Child Lock, just hold down the button for another two seconds.
Once the dehumidifier is full, it stops.
It does have a hose attachment so you can just have it empty itself as it goes along. You can use the water for plants which are not edible, and you can't drink the water. It stores about 4.8 litres.
It has this really helpful carry handle – I mean, it's crucial because this unit is 18 kg.
And, here's some footage of me niftily lugging it up and down the stairs to the upstairs and downstairs landings.
And of course, there are the caster wheels underneath which are hidden so it can slide and glide across the floor on hard floors and carpets.
There's a HEPA filter; it is an air purifier. It purifies the air as it dehumidifies.
We'll have the review now, and thank you, by the way, for hitting the thumbs up or subscribe button if this video is helping you.
Here is the full review.
I am calling this a dad delivers success!
It's magnificent. The air feels drier.
My unstoppable wife says that she's not walking around hunched; you know when it's cold and damp, you put your shoulders up around your ears?
The dry air, I've been told, is easier and quicker to heat, and cheaper as well because humid air carrying water needs more energy to heat it up, apparently.
So, it feels like the house heats up quicker with the dehumidifier on, but we don't know if that's in our heads. Either way, it definitely feels better.
I really like how the air comes out of the top of the dehumidifier.
It's not a heater, but the airflow that comes out does feel nice and warm, which helps.
I know you're going to ask me about the noise; it's like a low whooshing sound.
I'll just pause for a moment...
[FAN NOISE]
My microphone probably filters it out or boosts it, so the sound on this video probably isn't that useful, but it is like a low white noise.
We've had this in our daughter's bedroom, and she slept right through it, though she does sleep through absolutely anything.
I don't think I can sleep in the same room with this overnight, but you can have it running in another room or corridor or hallway if you're lucky enough to have one.
For me, it's been quiet enough for that. For what it's worth, I don't notice any noise difference in night mode, even though the fan speed is meant to be lower.
And I know you want to know how much power this thing uses.
Meaco says its power consumption is 250 watts, so that's 6 kilowatt-hours per day or 6 units of electricity if you leave it running all day.
We've left this running for the first couple of weeks to dry out the house; that's in October, so I'd hope the summer had kind of dried it out anyway.
I've looked at our electric meter readings, and I think it is using about six units per day, so that might affect how long you want to leave your dehumidifier running.
I cannot recommend the Meaco Arete One dehumidifier more highly; it is fantastic.
And if you want to see it on Amazon, there are links in the description.
I first download and export all my photos and videos to a backup drive.
I fix the Google Account Storage is Full problem by using the "Clean up space" options to clear my Google Drive storage using my desktop, but if you use the links below you can clear Google Photos storage in phone. Then I use a "Recover Storage" option to reduce ALL the photos and videos in my Google Photos to Storage Saver Size. There is no option to see what photos & videos are in my Drive at Original Size, so the only way is to compress all the photos and videos to free up some storage.
Finally, I show a way to create a Google Account for storage JUST for Google photos... and set up my phone to upload and sync photos and videos with this new Google Account. We can then use Partner Sharing to share those Google Photos and Videos with my personal Google Account.
THIS IS THE TRANSCRIPT - CLICK PLAY ON THE VIDEO ABOVE!
You know this day has been coming, and like me, you've put it off and put it off. Your Google Photos is full, nothing's being backed up, and you're getting these warning messages. They're going to stop Gmail, or they've already blocked all your Google products and Google Drive. You don't want to delete anything because all your precious family photos and videos are on here. But now this phone is getting filled up. Where do you even start?
This is a long video where I walk you through step by step how to fix your phone storage with Google Photos. This is my Unstoppable amazing wife's phone. But as a dad, the hospital didn't tell me this when you have a child, that suddenly I become the IT manager for the family. I'm no good at IT, but I have done this a few times now. It's a Samsung Android phone, but some of these tips are for all phones, and the time code for every step is down in the description if you want to jump forward or replay any clips.
The first step is to back up our phone.
We need to save a copy of all the photos and videos on here in case something goes wrong with this. We'll at least have them stored somewhere else.
You can save them to a laptop, a desktop PC, or a memory card or a big, rugged, colourful hard drive like this one. I'll put the links to these down in the description.
But I'm backing up my wife's photos and pictures to here via my PC. So this is my PC desktop. I've plugged the phone into the PC with a USB cable, and you can see internal storage is maxed out, as well as the Google Photos. The actual storage on the phone is maxed out. But we're going to try and find all the photos. So I'm going to look in internal storage, then DCIM, and then I'll look in Camera to see if there's anything there. There's nothing there, which is great because it means that all the photos have actually been stored on the SD card. So if I go back to the SD card folder, I'll go into DCIM, and there's Camera. Here are all the photos.
Now, I've tried doing this on my MacBook, but it just doesn’t work very well for me.
There's an actual tool called Android File Transfer. I just can't get mine to work at the moment. So I'm using a PC. You can also get storage cards to plug directly into the phone to back them up directly to a card. There's a link down in the description to one of those.
This folder is still loading up because you can see in the corner here there are 1,300 items so far and counting.
1400 now, it’s still going up.
I'm going to click on View, and I'm going to choose Details. It just makes it easier because it presents everything as a list. And this is everything.
At the top here, there are some files called “.trashed”
I'm going to ignore those. In fact, I'm going to delete those to try and clear some space on the phone. So I highlight them and I'll click Delete, and I'll delete those.
Those files have now gone, so I'm going to select everything in this folder.
Now bear in mind this isn't actually everything because, as well as the camera photos and videos, there are screen captures and phone recordings. You might want to back those up as well. I'm just looking out for the photos and videos.
I'm scrolling all the way to the bottom, and this is the last one here.
That is 1,647 items.
I'm now going to drag them into this folder that I've made for the backup file. So the PC is now copying all the files from the phone to my drive in my folder that I've got here on my PC.
It says it will take an hour and 10 minutes, but I know I have a safe version now of everything on the phone.
The next step is to shrink the size of files in Google Photos.
To get our Google account working again, we need to bring the photos and videos storage to under 15 GB.
I'm doing this without deleting any files or videos yet and without signing up to the Google Drive storage subscription because we do not know how much Google will charge for OneDrive in the future.
And I've seen it in the comments from you on my videos that we just fill up the storage allowance they give us, and then we face exactly the same storage problem again!
So let's now follow these steps from my other video.
So the first thing we're going to do is to change the Google photos upload size from original quality to “storage saver” quality.
You might have done this already but just let's make sure that that setting is set to storage saver because sometimes when the Google photos app updates it switches it back to “Original”.
So we're going to click on the avatar on the top right hand corner of your Google photos.
Don't click on “free up device storage” because that is just going to remove photos from your phone.
We don't want to do that. We don't need to do that.
What we are going to do though is go down to photos settings.
We click on that and then we'll click on backup and sync, which is the first menu item here.
If we scroll down we can see “upload size” and there are two ways that you can backup photos to Google photos: that is either “original size” which is the full fat big size of your photos and video...
Or this option here: “storage saver”.
Tip number two is that we're going to turn off Google photos backup.
And to do that we're going to click on the Avatar in the top right hand corner again.
We're going to scroll down to “photos settings” and then we're going to click on backup and sync.
There’s a little toggle switch here: we're going to turn that off and the reason we're doing this is that once we've cleared some space from Google photos we don't want to be filling up Google photos with the pictures that are in our phone again.
And later on I'm going to show you how you can set up a Google account just for your photos and videos.
The third tip is to remove any obviously unwanted Google photos and videos.
Click on the Avatar in the top right hand corner, and down underneath the “account storage full" you can see this button with three dots.
I'll just click on it and that takes us to the “out of storage” window.
There's a section down here called "review and delete” and this is where it offers to show you screenshots, blurry photos, large photos and videos, and other apps.
Now I don't particularly want to delete these, but there might be some big ones here that you can delete.
You can see from the sizes here aren't huge and I don't think they'll bring me back underneath the storage limit, which brings us to tip number four, and this... this is the killer tip.
This is how you and me are going to beat Google, and it's to reduce the size of all the photo and video files in Google photos just in one go.
Now you can't do this on the Google photos app, which I think is pretty disgusting, so what we need to do is to open a browser on your phone.
If you have an Android phone that's probably Chrome, and if you have an iPhone or an iPad that's Safari, and we'll type in photos.google.com
Next on the top left hand side, you see the three lines there?
We click on that to open the menu just to make sure that we are logged into the correct Google account.
You can click on the Avatar face there if you want to change the account.
Next we'll scroll down, and down here where it says storage we're going to click on the word “storage" and this is like manage storage on the app...
But if you scroll down, the app doesn't have this option: “recover storage”.
And by the way if any of these tips are helping, please say hi in the comments or hit the thumbs up button. It really helps other people to find this video so thank you.
On the “recover storage” option here, we're going to click on “learn more" and it opens up this scary warning.
Now we don't know which photos and videos in Google photos are at the big original size or the smaller storage saver size. By clicking on this option, it will reduce all of the photos and video file sizes down to the storage saver size, which will free up loads of space.
I'm going to click this warning disclaimer here: I understand that it cannot be undone...
and then I'm going to hit the blue "compress existing photos and videos”
Now it looks like nothing has happened... look our storage is still at 16.3GB
If I scroll back down it says compressing.
It does take a couple of hours, let's see how this fixes my Google storage!
It's now 8:30... 7 hours later. Let's open Google photos app.
We were on 16 gigabytes. If I click on my avatar, whoa! Look at that!
Account storage 7.8 gigabytes!
We did it! Woah, we did it! So for me this tip reclaimed about eight gigabytes of storage, but more importantly it's got my whole Google account working again!
I followed those steps and now I have a storage total of 14 GB, AND more importantly, I've got my wife's Google account working again.
That's a win, surely!
It's got to be something that counteracts the tiny downsides of living with me!
Our next step is to create a Google account that's just for the new photos and videos.
And we'll send set this up in a way that doesn't max out our storage ever again.
I know it's a bold claim, but it works if we use something called “partner sharing”.
Take a look at this.
At the moment, if you share your photos and videos with another account using partner sharing, so you've got Google account number one and you create Google account number two... you can share your photos and videos from this account with this account - so that the photos and videos from this account can also be seen and searched and saved in this account.
Those photos and videos do not take up any storage space in that shared account,
Which means you can delete them off the original account where they were taken, still have them saved in the shared account, and those saved photos and videos do not take up any of your free 15GB of Google storage allowance.
So let me show you how to set up partner sharing step by step.
I'm going to do this in real-time, and you can try it out for yourself and follow along.
I'm going to do it on this phone.
You can do it on the desktop, I'm going to try this on a phone.
If I go into the Google Photos app, I have created this brand new Google account just for my photos and videos.
It's really easy, so let's make a Google account right here, right now, step by step.
You can follow along with me.
I have my phone on screen here.
Step One is open the Chrome browser if you have an Android phone, and then we'll open a new incognito tab.
Just click on the three dots on the top right-hand corner and choose “new incognito tab”.
If you have an iPhone, just open Safari and choose “new private tab”.
The reason we're doing this is to avoid being signed into Google already so that we can create a new clean account, and now we can go to google.com.
I'll just scroll down and accept the terms and conditions.
Next, we'll click on this button on the top right-hand corner, "Sign in," and obviously, we haven't created an account yet, so at the bottom of the page here, it says "Create account."
I'll click on that.
This page now asks us if we want the Google account for personal use, for my child, or for work or my business.
I'm actually going to go for "work or my business."
Now we can enter our name, and now we can enter our birthday and gender.
Google now offers us a couple of options for a Gmail name, or we can choose to create a new name for our Google account.
And now we can accept the terms and conditions, and it looks like it's a success, "Your Google account is ready."
Now I've signed my Google Photos app on my phone into that new account, and to check that you've done that, you just click on the top right-hand corner.
At the bottom of the app, at the bottom of the screen, there's a tab here called "Sharing," and if I click on that, here is a prompt to share your photos.
It's right here where it says "Share with partner."
If partner sharing isn't here, try going into a desktop on a computer and go to photos.google.com. Click on settings, which is the cog at the top here, and partner sharing should be on the list there. If it isn't, you might need to verify your account first.
Back to the Google Photos phone app, I'll click on "Share with partner."
Get my glasses on.
It gives you some options here, so it explains that setting up automatic sharing means that you can share your memories. So we can choose the starting date. I'm going to go with "all time."
I want all photos to be shared with the other account, and you can choose which photos to share. I'm going to share all photos.
Then I guess we'll click on "Select partner," and here we can type in the email address that we want to share the account to, and now we'll click "Confirm."
So it's told me that it's shared this request, this invitation with the other account.
Now we can go to that other account to accept the invitation.
So I'll click on the avatar in the top right-hand corner, and I'll log in the Google Photos app to my other Google account.
And here it is right now on screen, and I've got a notification saying, "Neil wants to share with you." So it's instantly told me that the sharing request has been made.
If it's not showing, make sure you've clicked on the sharing tab at the bottom of the screen here.
I can now click on 'View Invitation'. “Neil wants to start partner sharing with you.”
You'll be able to view photos shared by Neil. So hit 'Accept'.
And now, it offers to share back to the other account.
The questions look exactly the same as before. Choose starting date. We'll have all time. And choose photos to share. Let's hit 'All Photos'.
And then, I'll click 'Confirm'.
Now, it's given us an extra option, and this is the important bit to make this work, to make this unlimited. "Auto-save pictures from Neil.”
So it's offering to show those photos and videos from the other account and save them in this account. And it won't take up any of my storage.
So I'm going to hit 'Get Started', turn on auto-save so you never miss a photo from myself.
This is the crucial bit here.
Can you see where it says “the photos that you save won't count towards your storage as long as your partner continues to share them with you”. So what I will do, I will choose 'Save All Photos'.
And then I'll hit 'Confirm', “saving automatically all photos”.
But all of those photos are now going to be saved in my original Google account.
I've now logged into the other account, the new Google account that I created just to take photos and videos.
And you can see here that partner sharing seems to be working.
But if I click on “Neil's photos partner sharing”, I've got the same message here to auto-save. So I'm probably going to do this in both directions just for safety.
It takes up no storage, so I might as well do this. “Auto save pictures from Neil”.
I'm going to click 'Get Started', turn on auto-save. So I'm going to choose 'Save All Photos', confirm, and that is now saving all my photos from the other account to this account. It doesn't take up any of my storage.
Hello, me again. I followed those steps, so now I have a new Google account just for photos.
What I need to do now is delete from my phone all the photos that have been backed up to Google, because I don't want those old pictures filling up my storage allowance again on my new empty Google account. Remember, I've got them backed up to a drive and backed up on Google photos.
It takes way too long to do this one by one in the gallery. So, I'm plugging the phone into my computer again and just highlighting the pictures to delete, and then hitting delete on all those old photos and videos. They are now removed from my phone.
While you're doing this, why not hit the thumbs up on this video to let me know this might be helping? I really appreciate it.
This deleting will also free up space in the phone. Everyone just seems to fill up their phones until they crash!
Well, I know I do, and I think some people just buy another phone and leave them on there.
Doing this will give the phone a bit more life and protect your photos and videos.
Step five is to set the phone to backup from the Google Photos app to our new Google account that we created just for our photos.
It's really easy.
Go into your Google Photos app on your phone, click on your avatar on the top right-hand corner, scroll down to photos settings, click on that, then click on backup, then click on the Gmail address and change it to your new Google Photos account.
Scroll down, make sure the backup quality is storage saver because I keep a copy of the original files, and this will stop it from filling up again too quickly.
The beauty of this system is, at the moment, the brand new photos Google account will share all the photos and videos to my original old personal account.
And when I delete them from the photos account, they stay saved in the personal account. They're even saved at original quality.
I've been doing this for about a year now, and it's just so much easier having a Google account that's just for my photos and videos so they don't fill up my personal account.
Thank you for hitting the thumbs up button.
I've got other videos that might help if you click the subscribe button, and if you do either of those, it really helps me out. So, thank you.
And right here are all my Google Photos storage videos to keep you under that limit.
This is a weird video, I know. But a friend wanted to know if I had an old amplifier up in the loft he could borrow. What better excuse than to take you up there with me for an old fashioned YouTube Loft Tour!
Come along for this exciting trip up into the attic where my electronics go and have a rest...
THIS IS THE TRANSCRIPT - CLICK PLAY ON THE VIDEO ABOVE!
hello Gordon uh it's lovely to hear from you so you need to find a uh Hi-Fi amplifier I think I've got something just for you um you said you'd like it to be midi size now I can't remember if midi is like the um you know like the width of those awful all in one Hi-Fi systems you know from amstrad you know that kind of width or if midi is like the standard width you know there's like the width of a video recorder so I'll just get my dog let's put in now the first hurdle I've got is I've got to go into the Loft and Casper hates me opening The Loft ladder so let's see if uh if doggy goes nuts uh when the Loft opens no no he's on standby he knows he knows what's happening but watch this so I've lost the stick to open the Loft that's problem number two so use this baseball bat here we go right what's the dog here we go
so I need two hands
I'm not being attacked it's all right
I don't know why oh and foolishly I didn't turn the light on on my camera so we're gonna go up uh hang on okay I can't use the ultra wide lens with the light so this is probably really close to me now and here we are in the the Field of Dreams uh Harvest what can we Harvest I've got a feeling it's in this one so here's all my model trains and I think I've got all my life at the BBC fit into one box over there but all my electronics was... are here what's this so
I've got a cassette deck I've got mini disc player but this is this what you're looking for um I tried to get my son interested in this and he just does not want to know he wants one of those graphic equalizers like they had in Ferris Bueller's Day Off you know with the lots of buttons and the dancing LED display I think let's get this out
so is this what you're looking for Gordon because this this is absolutely brilliant there's a little graphic equalizer here which obviously you won't need um and it's got two outputs for speakers I'll show you around the back in a minute so you push them in to engage so that's you can have two sets of speakers obviously it's on off I've not used this in 20 years as well you can balance it left and right here oh that's uh hopefully you won't get any crunch there and I'll set it to the middle and then you've got three inputs as well so I can do that oh it's a Sanyo a JA350a and you can do a direct monitor of tape Source by clicking that in
there's a high filter and loudness I think that just gives it a bit of a boost and volume control here and then these LED lights dance up and down uh with the volume and then on the back we have so a a and b speakers left and right
regular just hardwired plug and then we have these phono inputs so I've got phono for a record deck and I'm I'm wondering if that's what you might need it for tuner, aux and record and play for the tape source is this is this what you need Gordon this is what I need to know is this or maybe it's just for um maybe just doing some DJing on the beach um setting up some kind of sound system I've got a much bigger amplifier so I should show it to you shouldn't I just think just in case uh I'd have to find it though so I might pause oh yeah by the way you know because you like old stuff look this is my I did look for the the very old Apple Mac I've got a very funny feeling I might have sold it 10 years ago um between some freelance gigs I don't know but look this look at this look you'll love this so in here is a bag of every mobile phone that I've owned ever I've got the um do you remember this this was a um so you didn't want to do any work today did you um
that's that's a bag sorry I just want to show you this camera um I don't think it works anymore it's a flip camera do you remember the flick cameras um you just literally press record there and if I pull this button from memory you just stick it in it's a USB so it looks terrible because the the plastic is kind of decaying it's a bit of a shame isn't it but look at all these flow oh look at all these phones are my favorite phones um
I thought I had my phone that opens up into a keyboard um that's in another bag and then I've got a really super old orange 5.1 that I bought off eBay about 10 years ago because I knew it would be a thing
I'll show you this just for the fun remember this Oh Happy Days Sim got mild case um anyway so that's not that's not why you called cooler uh trying to remember which box this might be in here we go let's try so I'll pause the video and I'll see if I can find the other amplifier
this isn't the amplifier but I thought you might like to see it this is my old mixer that I used to do mixtapes in my room too um I don't think it's working anymore why why am I keeping all this Gordon
okay okay I've found it underneath the Christmas tree I've got this look at this CD this CD players like the one at UKC radio um I got it from that auction from the from TV Centre when TV Centre was sold off um it's not that good actually because the button's quite sticky but underneath it I don't think I think you'd prefer the Sanyo one but this is my other amplifier it's a Sony three and it's huge it's a beast and there's a Dolby Pro logic sorry about the focus um system with auto input balance and you can you can put video into it as well as audio but it's really heavy so this would not be fun to bring to uh to Brighton but if if you prefer this one hang on pause it and we'll see the other we'll see around the back and here we are around the back my goodness you must have an amplifier like this surely for your um so I'm really curious I'd love to know what you need this amplifier for but just in case this one is of use you can put videos into it LD Happy Days uh video three video two video One video monitor and then phonos and it's got these phonos in and these outputs but I'm sure your amplifier would be much better than this one so here's the question is any of this any good love your work see you soon can you please help my daddy get 10000 subscribers just click on his face thanks bye all right this is going to be the proper one right?
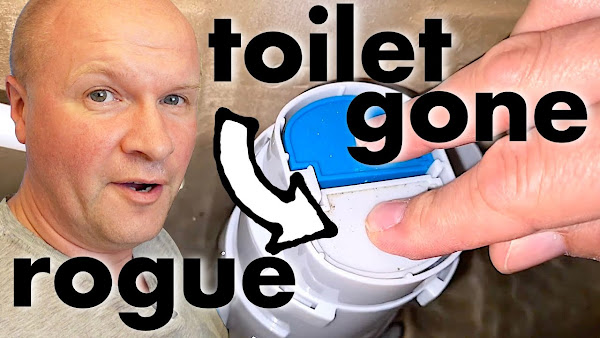
Our toilet won't stop flushing. After pushing the flush, the water keeps running from the cistern.
I try one way to clean the flush with limescale remover... which works for a bit. But then the non-stop flushing returns... so I'll have to take the toilet apart.
THIS IS THE TRANSCRIPT - CLICK PLAY ON THE VIDEO ABOVE!
thank you this is the problem come come with me under here that's what it just keeps Flushing so it doesn't start the only way to stop it is by jabbing your finger on the button like this
and then it stops uh flushing or emptying and the system fills up so how how am I gonna fix this this is the dad delivers Vlog where I try new things to make your family happy like those words but I'm really going to make my family happy if I can fix this toilet somehow well the thing I'm going to try is if I lift this up I can't see anything broken or wrong here in the old toilets it was really kind of a bit more basic but this is all kind of uh sealed up and the main problem seems to be of the two buttons it seems to be this button and it just feels it feels like hey if they both feel the same
um so if I press this one
let's stop this which stops stops that all right so now it's filled up so it is something on this button once it flushes it just kind of stays open and I can't see anything that's really obviously wrong and sometimes it does work but sometimes it doesn't so it's really inconsistent I'm going to turn off the water supply to the to the toilets down here so I'm trying to hold the camera at the same time ah right so we're gonna flush it now hopefully [Music] no new water comes in and then I don't know I'm just going to drench it with a life scale remover
if it's safe should I try it it's all plastic isn't it oh let's just put it in see what happens
and I can't quite get into it so I'm going to squeeze it in I would have used Viakal but I've gone for a supermarket version already this
briskly so it emptied most of the bottle in I should just put the whole lot in but I'm gonna pour some on the top here it's like oil I'm not sure this is going to work but let's leave it for an hour see what happens
now hopefully this will stop everyone using the let's wait up for an hour we'll see they're probably just wheel over it it is one hour later and uh I've just been I should have done this at the beginning but I've just been looking at some videos on YouTube and I don't really want to take this apart but I think that's what we need to do we'll see if the fire cow or lime scale remover has cleaned up the valve at the bottom there's like a big washer at the bottom and that's not coming down again when I push the button so it's this is completely fine that's not the problem problem is it doesn't shut off at the bottom once it's flushed once it's done its job
let's Let It flush so now it's filling back up
releases had a bit of a clean now I'm going to press flush
do you like this speeding up I think it kind of works this might be the new channel uh I'm gonna keep flashing it until I break it well that seems to have fixed it so okay it lasted a couple of days it's a few days later and it's it's back it's happened again it did really work it did work for a while but now now it doesn't so I've got to do something a little bit more major um let's find a screwdriver and turn off the water yet again maybe I should turn it off permanently and have a dry toilet like they have on Van life let's lift the lid again I've watched this video on YouTube where he sort of Twisted off the middle section and then lifted it up and just uh fixed the washers like a giant washer there as if I can do this with one hand but I'm going to try the same thing so I could really mess this up oh okay yeah that twist [Music] twist yeah it doesn't lift up let me try it the other way okay so I'm going to turn it anti-clockwise and find it a bit difficult but
I don't want to snap it okay there's a small blue catch down there I pressed in and that seems to make it easier to oh no that button there I'm going to press that in as I'm turning it so I can't push it in now as it turns oh that's difficult I did have it there we go okay so I turned it all the way and then I turned it back again and that seemed to release it and down there it looks like it's a bit of a blockage that doesn't look good does it
so this is this is what um what happens when you press the button it lifts this Central section up and there's like a washer there that's all looking really clean and that works well it's not looking great is there there's like a white I already put my hand down it but it's gonna be safe isn't this just clean water isn't it uh there's some kind of weird white stuff there I might just get a stick or something although you know what that looks like it's sealant that's gone in maybe it's from where the the plumber put it in so if I get a stick I think it might be sticking against that white stuff I've got this stick let's try this I had to shine a light Let Me Shine a Light down here for you so in goes the stick I'm just gonna produce it just to save
no that's the only thing I can see that's affecting it because there's nothing on the washer so I'm going to try and cut that off maybe with a knife just open it up a bit okay I have cut out most of the sealant just peel it off with my hands that's most of it gone now in fact I think it's all gone now I've got to try and put this back in uh let's just give it a go
it goes back down I guess I didn't put it in quite the same way and I can't get it out again but I think I think we're good to go there just winging it and then get the lid well I don't need the lid back on let's let's leave the lid off just in case it's gone wrong I'll turn the water back on and then [Music] flush seems to have stopped this I think is the winner
and that is how sorry about the noise in the background that is how I fit I usually have a lot more fun than this on the channel I promise so thank you for hitting the thumbs up or the Subscribe button if this does help your toilet situation and right here is what YouTube knows that you are going to love watching next it's better than toilet fixing can you please help my daddy get 10 000 subscribers just click on his face thanks bye all right this is gonna be the proper one right?
This is my unboxing and first impressions review of the Meaco Arete One 18L Dehumidifier and Air Purifier we bought at Costco. I think it's a Costco exclusive because the other Meaco Arete One dehumidifiers are 15L, 20L and 25L. We absolutely love this dehumidifier... but the video concentrates on unboxing the unit and its advertised features, my full review covers how this works and how we're using this now (link above!)
It's quiet enough to run it in your bedroom, but I find it a bit too loud so run it in the hallway. It is big enough to dry out a regular house... In the first week we had to empty the 4.8 litre collection bucket about every 6 hours, though this goes down over time.
The power rating is 250W, which is about 6 kWh or 6 units on the electricity meter if you run it all day long.
The whole house feels dryer, and it's early days but we think it's already really helping with mould in our house caused by high humidity. For us this is the best dehumidifier.
We've used it in the hallway to reduce humidity, and in a bedroom to really prevent mould, and in laundry mode for drying our clothes: this Meaco dehumidifier is working absolutely brilliantly. We have no regrets - if we do, I'll come back here and change this description.
Hope this helps in your search for best dehumidifier reviews!
TRANSCRIPT: (CLICK PLAY ON THE VIDEO ABOVE)
THIS IS THE TRANSCRIPT - CLICK PLAY ON THE VIDEO ABOVE!
Hello, I'm Neil, and the new thing we are trying is this Meaco Arete One dehumidifier.
It is absolutely magnificent.
We've had this for about a month now, and it has taken so much water out of the air.
It really feels like it's drying the actual building out.
You might have this problem too.
We have really bad patches of mould in our house. There's some footage of me cleaning up the latest batch. But since getting this Meaco dehumidifier, the air feels drier. The whole place feels warmer all the time without that damp air lingering around.
I paid for this with my own money. I actually bought this. So this is an honest review.
I’ve made a full review of the Meaco Arete One dehumidifier: there’s a link down in the description.
This is the unboxing, the first impressions review, so you can see what this looks like straight out of the box.
We saw it purely by chance in our nearest Costco.
The Meaco dehumidifiers were all sold out last year. We saw it on the shelves, and money is really tight right now. But I don't think we could face another year of cleaning mould off our coats and walls. So what else could we do?
Well, I did not think we'd pick up a humidifier today!
A dehumidifier!
We came in for some lemons.
Let's open up this bad boy.
This is the Meaco, the MeacoDry Arete One, or is it Arete One, arete petite!
And Meaco have called their brand "Meaco Dry," which I've not heard of before, but I love this "Excellence in all things." They've even given themselves a Japanese-style overblown sentence of a mission statement because this is actually made in the UK. Well, no, it's not made; it's designed in the UK. It's made somewhere else. But we've got a nice Union Jack there. Let me give you a quick spin around the box so you can see exactly how the Arete One 18L dehumidifier arrives.
Let's open up this bad boy dehumidifier and see how the Meaco Arete one comes straight out of the box.
The box is quite stylish, isn't it?
It feels quite heavy, quite substantial.
I'll put the weight of this particular unit on the screen now.
Here we go.
So, a lot of plastic wrapping.
Hello, future Neil.
I know this is how we used to live.
We're in the UK, so obviously it comes with a UK plug.
And there is a pack of, oh, look, there's a filter that comes with it. We'll have a look at that.
It says it's a free HEPA filter.
And then there's a bag of instructions.
It's quite nicely presented, but oh, come on, how big is that text?
That must be only 10-point text.
It wouldn't kill you to make the instructions bigger, would it?
The sides are taped up so that they don't fall off, so we'll pull these bits of tape off for our first impressions unboxing.
And then, at the top, there's a sign here:
"The handle is below this label. Please lift the handle by pulling upwards with one hand at each end," which means I can demonstrate it one-handed because I'm holding the camera.
You kind of lift each one at the same time, and that's your carry handle there.
That's quite sleek, isn't it?
Oh, I'm not sure I want to lift it, though.
So that's a nice touch.
And then we have the control panel, which is flush and all wipe-clean.
If I use the handle to tilt it up slightly, you can see the roller castors underneath.
I don't want to lay it down because I don't want to scratch it, but there are four castors, so it should glide across most floors.
Let's turn it around.
This looks like a really well-built, substantial unit.
I really like how it comes out of the box.
It looks good.
Here's the, I guess, this is the bin, is it, for catching the liquid, and helpfully, there's a circuit diagram in there.
That's very thorough, isn't it?
I won't be consulting that.
The power cable, the cord.
Let's get that out. See how long that is.
It looks like it's about 2 metres. Yeah, I'd say it's about 2 metres long.
Very generous.
And there's this cord storage thing that you can wrap the cable around when you are storing the dehumidifier.
At the back, oh, this slides out.
Oh, look at that.
So, I guess this is the element.
I've opened up the HEPA filter, and I'm going to put this into, I guess this is the filter holder.
I haven't read the instructions yet, but I'll put on screen if this is wrong, and then you slide this in.
I guess there's only one right way to do this, and that clicks.
So the filter is held in place.
Let's read some of the features that are on the box here.
There's a user-friendly display, one-touch ease of use, contemporary controls.
It's sleek and unobtrusive.
The side air intake allows the dehumidifier to sit discreetly against the wall.
It looks like Eva from WALL:E to me!
You can easily clean the filter from the side without moving the unit. There's a cable tidy to keep wires out of the way and tangle-free. A hidden handle for sleek lines along the top.
There's a large window which lets you see the water level really clearly.
Water can be emptied from both the left and right-hand sides.
Oversized ergonomic handles make it easy to remove the water bucket, and castors underneath are hidden behind feet that help the dehumidifier blend into any room.
We have had this Meaco Arete One dehumidifier and air purifier for over a month now, and we absolutely love it.
For us, we're not rich, and this seems like an insane amount of money to spend on anything, let alone something that sucks water out of the air.
I can say without doubt this is the best thing we have bought this year.
The place just smells better, and it might be in our heads, but our home definitely feels less damp.
I'd even go so far as saying this is the best dehumidifier that we can find right now.
I cannot recommend the Meaco Arete One dehumidifier more highly.
It's fantastic.
And if you want to see it on Amazon, there are links in the description.
I am calling this a Dad delivers success!
Say hi in the comments down below.
It'd be lovely to hear from you, and thank you for hitting the thumbs up or the subscribe button. It really helps me to keep this channel going. And right here is what YouTube knows you are going to love watching next.
First of my new series of Bung It In The Air Fryer sees me cooking 4 rashers of bacon in a Ninja Foodi Air Fryer for my family. And our dog. I'd call it a kitchen recipe but it's more like me getting a pack of bacon and Bung It In The Airfryer. I cover temperature, air fry instructions and how long to cook the bacon.
BUY A NINJA AIRFRYER HERE! (As Amazon Associate I earn from qualifying purchases)
THIS IS THE TRANSCRIPT - CLICK PLAY ON THE VIDEO ABOVE!
Whoa, that is looking really nice and sizzly. This delicious bacon is a gift from my future self. Hello, I'm Neil. I've not cooked bacon in an air fryer before, so that was in the future. I've edited it in. I'm doing this for the very first time, and I'm doing it on this air fryer, this Ninja Foodi Max Dual Zone air fryer. But I'm hoping that this will work with any air fryer. Let's get started. This is for a new series on the channel called "Bung It in the Air Fryer," and today, I'm getting this bacon to bung it in the air fryer. And for this, I'm taking four rashers of regular bacon. I'm laying them out in the basket and I'm overlapping them on the tray. We don't have to be too precise with this. I'm going to move it around while I'm cooking. So now, let's bung it in the air fryer.
I love the air fryer, but the trouble with an air fryer is that you need the booklet to tell you how long to cook everything, or end up going online to look up videos like this. So, I'm actually making this video for myself, so I can remember how long to cook the bacon for. Let's put it in. Ninja says you don't have to preheat to cook in their air fryers. I'm going to choose the air fry program. I'm going to dial up 220 degrees Celsius, that's 430 degrees Fahrenheit. And then, to put the time in, you press the time button and you hold it to take it down to one, and then we'll dial it up to six minutes. And then, to start the thing—I had to look this up, but I didn't even see the big start/stop sign—you just push this button in, and then we're away. Let's do a time jump. It's about halfway through, so let's see how we're doing. It's looking quite nice, isn't it? I'm just going to toss it over and shimmy them around, just so that all bits of the bacon get the benefit of the heat fans. And then, I'll put that back in, start it going again.
Now, this is smelling delicious, but I've got some smoke coming out from my smoky bacon. We had to move our air fryer out onto the counter because it just kept tripping off our smoke alarms. I'm not sure if you had that problem. Leave a comment down below if you've got smoke alarms and an air fryer that likes to entertain you. Three, two, one, we are done. This is how it looks. Let me get a light for you. Whoa, that is looking really nice and sizzly.
[Music]
Let's cut into one and see what it tastes like. Oh, we've got Casper. Casper the dog is hovering, looking very hopeful. Yeah, dream on. Look, I can see you. I can see you there we go. Four rashers of bacon. Oh, these are looking great. I don't like mine that crispy, so maybe you could put it on the Max Crisp if you like it crispy. I've not experimented with that yet. This was just on the regular air fry, but they are looking absolutely delicious. It smells amazing. Let me hold it up to the camera. This is absolute torture. I just want to sink my teeth into this right now. But this is how it looks. Like, it looks like bacon. Ah, tastes like heaven.
I am calling this Dad Delivers Success. I've got bacon on the lens there. Oh, I don't want to talk with my mouth full, but thank you for hitting the thumbs up button or the Subscribe button. And right here are all the other things that I bung in the air fryer. Can you please help my daddy get 10,000 subscribers? Just click on his face. Thanks, bye. All right, this is gonna be the proper one, right?
How do you subscribe to Amazon Prime? If you want to buy Amazon Prime membership I walk you through how to get Prime step-by-step for beginners. We have to use the website on a browser on either desktop, laptop, Android Phone, iPhone or iPad. This also signs us up to Prime Video for the Amazon TV, Movies and Amazon music service!
THIS IS THE TRANSCRIPT - CLICK PLAY ON THE VIDEO ABOVE!
Hello, how do you get the Amazon Prime membership?
As you know, with Prime, we get music, movies, TV, and games with Prime Video, plus unlimited fast delivery, which is probably what we use it for. It's really easy. We are going to subscribe to Amazon Prime using just an internet web browser. You can do this through the Amazon shopping app; just click on the Prime button, but it does divert you to the way that we're doing this anyway.
Click on the link down in the description and follow along with me step by step because the new thing I'm trying to make your family happy is to buy Amazon Prime membership. On your internet browser, either on your phone or a laptop or desktop, go to your Amazon page that's local to your country or use the link on screen now or down in the description. To show you the process, I'm going to amazon.com.
Then, go to "Account" on the right-hand side here along the top bar, and then choose "Your Account." I'm a what?!
”Your Account"
And right at the top, you will see a big box for Prime. Let's click on that. There might be a deal waiting for you, maybe a month's free subscription or a week at a discounted rate.
I'm going to click on "Start your free 30-day trial," and now I'm going to scroll down and click on "Sign up and pay."
I... I thought I'd get a bigger message than this, but it just says, "Welcome to Amazon Prime. You now have access to instant streaming of thousands of movies and TV shows."
I am calling this a Dad Delivers Prime success!
We can even download and sign into the Prime Video app to watch whatever we wish.
If this is working, say hi in the comments. It would be lovely to hear from you. Thank you for hitting the thumbs up or subscribe button; it really helps me out.
And right here is what YouTube knows you are going to love watching next.
This video is for dogs! A high pitch squeaky toy sound for 1 hour! One hour of squeaks and dog toy sounds to make them join in and bark and howl. Casper the dog loves this, judging from his barking and howling. It's a squeaky toy, or we took the squeaker out and play it like a dog whistle.
BUY A SQUEAKY TOY FOR DOGS HERE! (As Amazon Associate I earn from qualifying purchases)
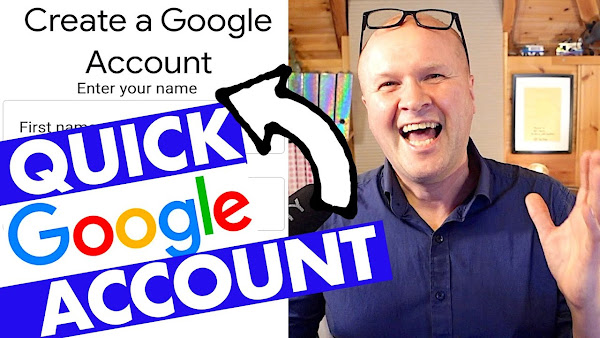
How do you create a new Google Account? I show you step-by-step how to make a Google account using just your phone and a web browser, for Android or iPhone or iPad.
All my Google Photos tips and tricks are here: 👇👇👇👇
THIS IS THE TRANSCRIPT - CLICK PLAY ON THE VIDEO ABOVE!
[Music]
How do you create a brand new Google account using just your phone?
Maybe you want to have it for a new Gmail address or YouTube channel. I'm making a Google account that's just for my photos and videos for the Google Photos app.
It's really easy, so let's make a Google account right here, right now, step by step.
You can follow along with me.
I have my phone on screen here.
Step One is open the Chrome browser if you have an Android phone, and then we'll open a new incognito tab.
Just click on the three dots on the top right-hand corner and choose new incognito tab.
If you have an iPhone, just open Safari and choose a new private tab.
The reason we're doing this is to avoid being signed into Google already so that we can create a new clean account, and now we can go to google.com.
I'll just scroll down and accept the terms and conditions.
Next, we'll click on this button on the top right-hand corner, "Sign in," and obviously, we haven't created an account yet, so at the bottom of the page here, it says "Create account."
I'll click on that.
This page now asks us if we want the Google account for personal use, for my child, or for work or my business.
If you choose "for my child," it will try to attach that to a parent Google account.
I'm going to avoid that. I'm actually going to go for "work or my business."
I don't think there's that much difference between that and a personal account; it's just how Google chooses to collect data on the account.
Now we can enter our name, and now we can enter our birthday and gender.
Google now offers us a couple of options for a Gmail name, or we can choose to create a new name for our Google account.
Now it's time to create a password for this new Google account.
Now Google wants to check that we're not a robot, so they'll send a verification code, and now we need to enter a recovery email address.
The next screen invites us to choose our settings for this account.
I'm going to choose "express," I think, and now we can accept the terms and conditions, and it looks like it's a success, "Your Google account is ready."
Now, because we've set it up for business, it has some additional questions.
I'll hit "not now."
We are now good to go with our brand new Google account!
Congratulations, and let me know in the comments if this works for you. Thank you for your thumbs up or hitting the Subscribe button; it really helps me out. And right here are all my other Google tips and tricks. Can you please help my dad get to 1 million subscribers? Just click on his face. Thanks, bye. Can we have dinner now?
How do you cook frozen croissants in an air fryer? I bake these delicious supermarket croissants from frozen in our Ninja Foodi Air fryer in minutes, and share the temperature and airfryer cooking times. With MORE air fryer recipes and breakfast snack ideas in the playlist below!
BUY NINJA AIRFRYER HERE! (I earn from qualifying purchases)
THIS IS THE TRANSCRIPT - CLICK PLAY ON THE VIDEO ABOVE!
Oh, these are looking good. Let's put them on the plates really gently, delicately. Woah! For the next Air fryer breakfast snack idea. I'm going for these Frozen croissants. We've got these in the UK from Aldi, but I bet you can find some wherever you are.
Now I've got to convert the time. It says, uh, fan on 180 for 20 minutes, so I'm going to drop the temperature to 160°C. I'll put Fahrenheit on screen now. I'm going to turn on the air fryer and put it on to bake. 160 has come up, so I'm going to set the time for probably, probably for 12 minutes just to check how that goes. So, and I'm doing three croissants.
Hit start. Now the challenge with the Frozen croissants is that we've got to have the temperature high enough so that the pastry cooks through, but we don't want to make it brown and come out brown and hard. We are about halfway through now, so let's see how it's going. Oh, the camera's a bit wobbly. Wow, these are looking pretty good. They're on their way, but I'll keep them going.
It's 2 minutes to go. I think I'm going to turn these over, so let's get the tongs. Maybe I should do it by hand. And so we go. I think I'll flip them over just so they get cooked all the way around. But when I'm doing this, I think it's probably not good to interrupt the cooking, but let's see what happens if I turn them over, so we get a nice even cooking on there.
So the cooking time's over at 12 minutes. Let's see how they look. Waa, it's looking great. I'm just going to, ow, excuse fingers. I've got clean hands. I think they might be a bit soggy in the middle, so I'm just going to give them another minute. So I need to reset it to bake 160, and we'll just go for 1 minute.
Time's up. Let's see how it looks. Oh, these are looking good. Put them on the plate really gently, delicately. Woah. I still think that's going to be a bit doughy in the middle. Oh my goodness. Okay, I'm going to put them back in. I'm going to gamble it, uh, so just throw them in, and then we will, uh, go for another minute.
Woah, it's air fryer gambling, isn't it? Let's try again.
Yeah, I'm calling it.
Yeah, I'm calling that success. Dad delivers success. Let's cut into them now and see. So I've got my daughter on camera there. Good work. Right, let's cut into one and see how it's come out, and we'll know everything's okay. Oh, obviously it's collapsing. Yeah, I'd say that's a, a success. That's looking pretty cooked for Frozen croissants, I would say: Try 320°F or 160°C for 14 minutes. You might want to try 16 minutes, so 14 to 16 minutes depending on how big they are and how many you've got.
Can you please help my daddy get 10,000 subscribers? Just click on his face. Thanks. Bye! All right, this is going to be the proper one, right?