Tuesday 9 April 2024

Amazing Fridge Freezer American Style at SAMSUNG EXPERIENCE KX Kings Cross RS6HA8891SL


BUY a Freestanding FRIDGE FREEZER on Amazon HERE! 👇👇👇👇 (commissions earned)

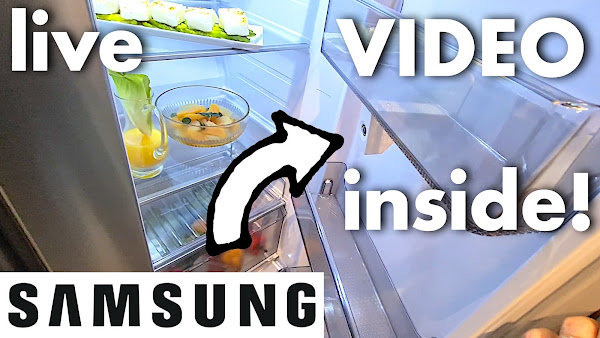
Come Fridge shopping with us! We're taking a look at the stylish SAMSUNG RS6HA8891SL American Fridge Freezer at the new SAMSUNG EXPERIENCE KX in Kings Cross, London. 
This Fridge-Freezer has SmartThings cooking: a live video screen on the door and camera inside the shelves!
It can connect to your Ring doorbell so you can see inside the fridge and outside your house.
Also features large door trays and fridge storage, plumbed in water and ice dispenser and a multifunctional rack-and-shelf. 
Hope this tour is useful if you're looking out for the best new Samsung American Fridge Freezer reviews for your kitchen.

Amazing Fridge Freezer American Style at SAMSUNG EXPERIENCE KX Kings Cross RS6HA8891SL


TRANSCRIPT: (CLICK PLAY ON THE VIDEO ABOVE)

THIS IS THE TRANSCRIPT - CLICK PLAY ON THE VIDEO ABOVE!
Hello if you're looking for American style fridge freezers you know how much of a pain it is going out to actually see them. 
We need to see these things in real life before deciding what to look out for let alone which fridge to buy. 
We are looking for a double width fridge freezer so I've been filming every single one we've seen and putting them in this playlist here. 
I even reached out to Samsung's PR to see if they'd lend us a fridge for us to show you! 
That request didn't go down very well but - they said - but Neil, have you seen our Samsung Experience? 
I hadn't and it turns out there's this brand new Samsung Experience KX in King's Cross in London. 
It's sort of like a Samsung theme park which has three American style fridge freezers - all in kitchen settings with other Samsung products sprinkled around. 
So in this video we are looking at the Samsung family Hub RS6HA8891SL American style fridge freezer with smart things: a live video screen on the door in aluminium. 
Or is it aluminum. 
Here's how the fridge looks like inside. 
So inside the Samsung Experience... here we go. 
Hang on, I'll just put my bag down... 
I... I will put the model on screen now and obviously there's a... there's a camera inside the fridge for this screen. 
It's got a water dispenser uh... so it's got the... the handles on the side. 
As you know, fans will know that I prefer having a handle that you can hold, but I guess this makes it more Sleek. 
Let's go freezer first: and there's the... the water dispenser section which... and crushed ice... which I'm... I'm not a huge fan of because it takes up so much space in the freezer section uh... 
I'd prefer to have extra shelves but what's lovely about the Samsung fridges is that their shelves are really deep. 
There's only one shelf there and then there's a little shelf down here. 
And then we've got these bins at the bottom um you have to close that one before the top one opens. 
Also it's um prevented by the door, you have to open the door all the way to uh to open those fully. 
But really nice five shelves there one two three four shelves and two bins. 
But then... there... the I'll save the screen for a moment... in a moment.
What I love about the fridge interior is that it has the metal back um... it just looks nice. 
I don't know if it functions differently and we've got one two three four shelves uh... and I believe this is special, I can't remember 
I'll put it on screen now. 
There's a word for this tray that can hold bottles as as well as be a shelf. 
And then we've got fruit and veg storage. 
I'm saving the best bit for in a moment but we've got five shelves. 
So four big ones and one little one at the bottom. 
And these these shelves look smaller than the regular... than the other Samsung models um yeah... that's a bit small for me. 
And then there's a camera there for the... the what's on the inside. 
And a speaker I can see food getting in that cuz we got food all the way up our fridge. 
I can see that speaker getting damaged. 
God I can see this... this screen getting damaged as well in our house. 
I don't know how our fridge got dented but it has and this shows what's inside. 
Takes a snapshot. 
So if I take the drink, what happens if I take the drink? 
It takes a while to update it's not a video feed it's a snapshot. 
Maybe this is just a demo thing oh no there there we go, it's updated!
I don't know what food list is... oh look... is that automatic I'll put that on screen if it's automatic. 
And you can add things.
[Music] 
That's good, it's got a little inventory and if I put that on home and we've got the smartthings home. 
And then I love this, it's got fridge manager. 
Oh look you can move... move the window around.
[Music]
That shows inside the fridge, so it's 26° in here it's quite warm. 
30% humidity. 
Making Ice is on. 
Water filter is clean. 
And then you can set the temperatures here. 
Oh look at that so I can make it 2° and hit save.
[Music] 
I can reduce this to - 18°?
[Music] 
No. 
Wow and it syncs up with your phone through the smartthings app.
[Music]
This is this is what it looks like.
[Music] 
And there's a thing over here: it's linked up to ring so if I click on the ring doorbell.
[Music]
I can hit view oh go back. 
I don't know what it did there... oh oh well you got a little snapshot of who was at the the front doorbell. 
Which is Handy if it's you know, Ocado or a Tesco delivering. You can holler them in from the fridge. 
Got a lovely display here. 
You get a much better idea of what it looks like in a home. 
Looks really nice. 
Lovely logo in the corner. 
Let me give you uh... open both shelves so you can see... see inside. 
[Music]
Yeah so look first impressions is: I... I still think the drinks dispenser would eat up space for the freezer storage and also our kids would feed the dog by just pushing it there. 
I could see that not ending well um... 
The shelves feel a bit small for me but it does have one big shelf down here, so I could get my big fat six pint bottles of milk in there. 
And yeah... this is this happens with most most fridges, let alone the Samsung ones... that the fruit and veg is blocked by the door. 
You have to open the door all the way to get all the way into the baskets. 
That's not... that's not a biggie. 
It's just something to bear in mind. 
[Music] 
And I hear that there's a special digital inverter compressor which is guaranteed for 20 years um... 
I mean I don't know in practice how you'd get it fixed if something went wrong. 
And obviously with this, I could just see this screen getting cracked. 
You know my family... we've got four phones in the family and three phones screens are cracked at the moment which is why I was here in King's cross to see if I get screen repair... 
oh wonder if they do that here I I'll check if they do that here um...
But yeah... 
That is the Samsung RS6HA8891SL SpaceMax. 
Thank you for hitting the thumbs up or the Subscribe button if this video is helping and right here is a playlist for all the American style fridge freezers we're looking at right now!

Previous post...
BEST FLYMO on AMAZON? Why Hover Vac 270 is perfect for lighter mowing!


All about me, and getting these by email.

Friday 5 April 2024

BEST FLYMO on AMAZON? Why Hover Vac 270 is perfect for lighter mowing!


What is the best Flymo lawn mower on Amazon? Should you buy the Simpliglide 330 or 300... or the HOVER VAC 270? This is my first impressions review of the Flymo HoverVac 270 hover lawnmower... in a medium sized garden with big holes dug by our dog, Casper. I try out the assembly instructions for the Flymo Hover Vac 270, and it's brothers the Hover Vac 250 and 270... to put together this lawn mower to trim our grass!

BUY FLYMO HOVER VAC 270 HERE! (commissions earned)

BEST FLYMO on AMAZON? Why Hover Vac 270 is perfect for lighter mowing!


TRANSCRIPT: (CLICK PLAY ON THE VIDEO ABOVE)

THIS IS THE TRANSCRIPT - CLICK PLAY ON THE VIDEO ABOVE!
[Music] 
Hello, welcome back to the channel. This is the Flymo hover vac 270 in action. Yes, it's time to do the garden, it's time to do the lawn, but which Flymo lawn mower do you go for on Amazon? 
Do you get the bigger Flymo simpliGlide 300 or 330, or this Flymo hover vac 270 from Amazon? 
This is future me with the hover vac in action in our garden, and this is what it looks like when it arrives from Amazon. 
The new thing I'm trying to make your family happy is picking the best Flymo lawn mower on Amazon. 
This is a first impressions unboxing review of the Flymo hover vac, and this is me mowing the garden in future happier times. 
So let's open this thing up! And it's, um, I can carry this. I'm not the strongest person in the world. 
Let's pull this out of the box. 
You've got the... the handles and then obviously the main unit. 
When it comes out of the box, if you lift this lid... inside, we've got some crucial bits and pieces. 
There's the handle for removing the blade and some spacers and the nuts to put the handles onto the Flymo Hovervac. 
Now this is a constant bugbear, Flymo, if you're watching this... come on! 
Can you make the instructions just a bit bigger? 
Think of your demographic! 
The first thing we'll need to do is to get the handles on. I'm doing this for the first time. I did put together the Flymo simpliglide which was quite straightforward so first we'll put this bar on and I'll just squeeze it so they fit in the sides here... like this. 
And then we'll get these plastic bolt things, just put that through. I can't do this with one hand so I've just pushed the bolt through the two holes there and then to lock it we'll push it through the final hole on this side. 
You have to really give it a squeeze to get it to click to lock like that. 
I'll show you a bit more clearly on this side.
So you put the bar in between the two bits of plastic there, get the plastic bolt and we'll push that through the... the holes. 
And then let me get the camera closer. 
Then we want to squeeze this bolt all the way through till it clicks. 
And I'm doing this with one hand so you will need two hands to do this, and you got to go all the way till that clicks otherwise it will fly out while you're mowing. 
There you go, it's more of a clunk so now this is in place and it means that to... it stays in this position which is good because the arm stays up. 
And then if you want to hang it up you can squeeze them together and it folds back so you can hang it flush against the wall, just by squeezing the bars there. 
Let's put the... the handlebar on top. 
Now should we keep the camera here? 
Let's keep the camera here. 
Oh, lost all my bits! 
I've got to get this done before we've got a storm coming in, of course, because I'm trying to do something in the garden so I've got to try and do this before... before it starts raining. 
If we get the handlebar I think it's saying I've got to do this? 
Maybe it's to kind of take the slack you know so it doesn't put a strain on the on the cable there. 
We've got the side nuts and bolts here so I'll unscrew this. 
When we put the handle up we want the button to be on the... on the top side, so it's this way up and then you hold the bar onto the side like this and then feed the... the nuts through and it goes inside out, so if you can see there's like a square uh end to the bolt there to stop it spinning around. 
And it says that the washer should go on the orange bolt side - the orange turning handle thing, so I'm going to feed the bolt through on the inside so that it locks there. And then we can put the handle on and feed the bolts through. 
And then the washer. 
And then the orange turny thing. 
Hope I'm not getting too technical for you! 
I won't put it on super tight uh because we got to do the other side - so the same deal here.  
Take the washer off, feed the bolts through, and make sure that the... the square part of the bolt locks into the square part of the hole.
And then we'll put the washer on and then the orange locking nut. 
There we go so we can tighten both sides now. 
I've had these things fly off and then get lost in my long lawn! 
Almost as karma for not mowing the lawn enough so I'm going to I'm going to do these quite tight because I don't want it flying off. 
And you get a very generous cable, I believe it's 10m on the hover vac 270. 
Oh when by the way the 270 refers to the... the blade the size of the blade in millimetres. 
So this is... woah! This is 27 CM. I went for 2 cm bigger than the hover vac 250 uh just to get me a little bit extra cutting width. 
And this is the... the tool for removing the blade. 
And you can use this to fit these spacers so that you can adjust the... the Cutting length.  
So if you want shorter grass, if you put these on it will lower the blade closer to the... to the ground. 
I just wanted to get the mower out before it rains! 
Uh Casper's uh an advanced party getting the lawn ready for me. 
I wonder if he's left me any presents on there? 
Casper no! No digging! 
Good boy. 
[Music] 
All we have left to do now is to fit the cable holder, and this is to hold the... the cable that runs from the start stop button down to the... the motor. 
You clip this to the handle or the arm and then you can just clip the cable on that keeps it nice and tidy. 
I've always thought with the distinctive orange and the... the really nice design... 
Oh look where I've mashed it on the table. 
It's like... it's like the Apple isn't it? It's like the Mac of lawn mowers! 
You have to take it as it comes. 
I thought the extra 2cm on the blade would help uh this is over a kilogram heavier than the Flymo Hover Vac 250 though. 
So those extra 2cm on the blade uh has put the weight up to 8.2 kg. 
And it's really easy to carry with one hand. 
For me it's much lighter than the Flymo simpliglide 300 or simpliglide 330. 
It has a 1400 Watt motor, a 27cm cutting width and the cutting height is adjustable. So out of the box it's about 3cm and it goes down to 11mm cutting height if you use the 3 spacers which are provided.
The grass box stores 15 litres. 
I remember on previous hover vacs I just took this off! 
It got really annoying having to empty it but uh it... it does store 15L of grass cuttings. 
As I mentioned there's 10m power cable and if you've not used a Flymo before it floats on a cushion of air, the spinning blade kind of um elevates it and makes it sort of hover above the... the grass so it makes it really highly manoeuvrable around the garden. 
Let me read you some of the features from the box while we're seeing me actually do some lawn mowing. 
The Flymo hover vac 270 is a lightweight grass collecting electric hover lawn mower. 
It's small and agile with a metal blade perfect for small lawns. 
This was a concern of mine because the previous hover vac I had had two plastic blades that you could clip on and it meant that if you hit a stone they'd fly off and you just clip them back on. 
I was worried especially with the kids having a metal blade. 
I had to use that with the Simpliglide over there - it's my dead Flymo Simpliglide. 
The metal blade is good because it... it really does um get through the long grass so I feel good about having that now. 
There's a nice wheel at the back to help you uh move it around. 
Let me show you the cutting box. 
Wow it's really windy! 
I think I think this storm is coming in! 
There's the grass box and when it's full of grass you just lift it up there's like a... a lip that clips on there and you can just go and empty it. 
And then to put it back you just put the clips in here so that it lies flush again. 
And then you can close the lid. 
Let's take it on its maiden voyage and I'll show you how... how it works so I've got it plugged in. And then you press the middle button and you have to do that while you're gripping the handle here, so here we go for the very first very first hover vac maiden voyage press the button and here we go!
[Music] 
It is so easy to... to use and it's really light. 
It's probably the lightest Flymo I've ever had and I've gone through about four of these and it's just gliding over the garden. 
You can see I'm getting it over the paving stones really easily. 
The blade doesn't even come close to making contact with the stepping stones so you can get this over some hard patio if you've got grass coming through your patio. 
You can run this over stones really easily, the hover is really good for it. 
Let me show you... it's starting some rain of course! 
Uh just quickly I'll show you what it's like getting it around our patch around the... the washing line. 
This is really easy to throw around a garden. 
But if you want something a bit more powerful or if your garden is a bit larger I would probably go for the Flymo Simpliglide 300 or Simpliglide 330 but be aware that that mower is quite a bit more heavy and it takes a bit more strength to... to put around the garden. 
So if you're older or... or maybe you don't have quite a good upper body strength you'd probably want to go for the Hover Vac rather than the Simpliglide. 
Casper out! out! out!
Got to do this first! 
Our garden is... is really challenging because of all the holes that Casper has kindly dug. 
His gardening uh experience means that it's like... it's like mowing the craters on the moon or after a bad day at The Somme. 
But the good thing with the Flymo is that it kind of glides over all of that. 
It's starting to rain now. I’ll call it a day. 
I am calling this Dad delivers success! 
Say hi in the comments and thank you for hitting the thumbs up or the Subscribe button it really helps me to keep this channel going and right here is what YouTube knows you're going to love watching next. 
Can you please help my daddy get 10,000 subscribers just click on his face thanks bye. Alright this is going to be the proper one right?


Previous post...
EASY! How to install IKEA HOPPVALS blind... Hoppvals cellular blinds instructions


All about me, and getting these by email.

Wednesday 3 April 2024

EASY! How to install IKEA HOPPVALS blind... Hoppvals cellular blinds instructions


How do you put up an IKEA HOPPVALS blind? I've put up about 8 Hoppvals and finally sharing how I'm replacing another one of these cellular blind installation! Sharing how I install my next IKEA Hoppvals blind in the Hut with step by step instructions...

EASY BLINDS! How I install IKEA HOPPVALS blind!


TRANSCRIPT: (CLICK PLAY ON THE VIDEO ABOVE)

THIS IS THE TRANSCRIPT - CLICK PLAY ON THE VIDEO ABOVE!

Hello, welcome back to the Happy Hut, and we're going to fix this today. 
Have you or are you thinking of getting the Ikea hoppvals cellular blind? 
It looks like this on the Ikea website and in real life, it looks like this. 
Let me get the camera. 
So it's really clever. It's um, usually looks better than this, but it's got like these cellular um, things that contract. 
It's like a fabric blind that kind of concertinas up when you open it, and there's a mechanism in here so you can pull it up and pull it down. 
So going down's not a problem with this one, but as you can see when I try to lift it up, it gets a bit jammed. So I've bought a new one. 
I've been using this daily for about 2 years now, and I've gone through a few of these. 
They are good, they're really good, but they do have a really finite life. So I'm going to show you how to put up an Ikea hoppvals cellular blind. It is really easy, so hopefully you can follow along step by step. 
Now I'm going to take this old one down, and I can show you how to do that as well. So the catches that we're going to fit, there's one here and one on the other side here, and they have buttons on them. 
So if you press the... press the button in, it releases a catch. This is really difficult to do with one hand. 
Let me put the tripod on. All we need to do is to push this catch in, and then you can rock it off the bracket, kind of push it off the lip at the back. 
I can do this on the other side as well, push the button in, and then it has enough space to come off the metal bracket. 
The problem with the Hoppvals, I absolutely love it, but over time there's like a string and pulley mechanism in here, and over time the string wears and there's like a... a coating for the string - wears down and that gets caught up in the in the pulley system. 
So it works like a dream, and I'll show you. Look here's some uh, footage of future me opening and closing the Hoppvals blind from Ikea like nobody's business. 
But this old one that's been going for a few years, the cord is all jammed up in the mechanism here, so it's time, it's time to move on and thank it for its service. 
I have got a brand new Hoppvals on the desk here. 
Let's open it up. Comes in some uh, different colours. I've gone for white to try and keep the inside of the happy Hut Bright. 
Oh, look fantastic! 
Look, they've completely changed it. 
So well, this this is really good news. 
So this I... I had... I haven't even put this up yet. I... and I endorse this blind. 
Thank you Ikea because instead of you saw the old mechanism, it's now been replaced by a really large spring. 
Oh, that's fantastic. 
And the cord is much thicker, so hopefully that will last longer and it goes over the four pulleys over here. 
So when blind goes up and blind goes down, I can't do this one-handed. 
So when the blind goes up and blind goes down, let's see what happens to this pulley. 
Can you see it? It pulls it along here, and it's counterbalanced by the the spring. So it pulls down really evenly, and then when I push it up, the spring takes up that slack. 
Oh, this is going to be really good. So the only next bit which might be difficult is how to put the brackets up. 
So you get a little box with the brackets - just open them up, and you also get a pull which goes on the end of the of the blind. 
I'll show you how to put that on in a second, but you get these two brackets. So when you push the button, it releases the catch, it makes this gap narrower, and that means you can rock the... the top lip of the blind off the brackets. 
Let's take down these two old brackets, and I can talk you through how to site the brackets, you know where to put the brackets on your wall or ceiling. 
So just take this one out. 
The great thing with Hoppvals blinds is that because they have this thing, they can clip anywhere to the bracket which means we don't have to be too precise with where we choose to put the brackets, just so long as it's anywhere in the middle to to hold it up. 
So I try to put mine sort of near the outside just to take the weight on both sides, and the brackets - they have a couple of holes, a few holes in the top so they could be screwed to the ceiling which is what I've done, or there are a couple of holes on the side there so they could be screwed to a wall if that makes sense. So you've got some options there.
I've chosen to do it from the ceiling, and I've got a nice wood ceiling, so it's really easy to screw them in. 
And I've put them... the width, I've put them apart is just literally anywhere on the inside, so you don't want them too close and in the middle, the further apart then the more... the more weight the more force they can take. 
So let's get the other bracket down now. 
I think you're meant to put two screws in. It's chancing it a bit to just use one, but I've been doing that for about 5 years now, and it seems to have worked which shows how good the system is. 
And the advantage of putting two screws in is that they are they have to be perpendicular, they have to come out straight, it's dead straight you don't want it wonky. 
Let's get the other bracket in there, we go, so now we have, let me show you closer, we have a dead right-angled bracket, one there, and one there, there I could even put another screw in the wall here, this is absolutely not going anywhere, it really works well. 
The brackets are really nice and strong. 
To get the blind onto the brackets, we are going to hook the blind over the back lip of that bracket there, and same on the other side, and then you can just kind of force it, and the spring will snap the button back in. 
Obviously if you push the button in that's even easier, but I only had one hand, so now that's absolutely dead solid. 
And if I hold the camera back, I can now pull the blind down and demonstrate just how smooth this is, it's so good, there's a spring in there now, amazing. 
I'm going to tear off the sticker, well it's left a nice bit of uh, residue there, and now I can use this tag. 
This is where you're really supposed to pull the blind down, I'm going to put it in the middle and I'll hook this at the back, hopefully I can snap it on, let's see if I can snap it on, I think the way to do this is to force it on and get it to snap, it's going to feel like it's breaking, but trying to slide it on really didn't work for me, so let's let's see if I can force it on this way. 
Yeah there you go, you just force it over like that, learn from my mistake. 
And then you can shimmy it around once it's on. 
And then to put the blind back onto the brackets once again, I'll hook it from the back on the brackets, and then I'm just, I'm going to push the buttons this time. 
And that will hold your Hoppvals blind. 
Let me get the old blind, just to say I am calling this a dad delivers success! 

Previous post...
DELICIOUS French Fries in Air Fryer! Ninja Foodi Max Snacks!!! 🍟


All about me, and getting these by email.