
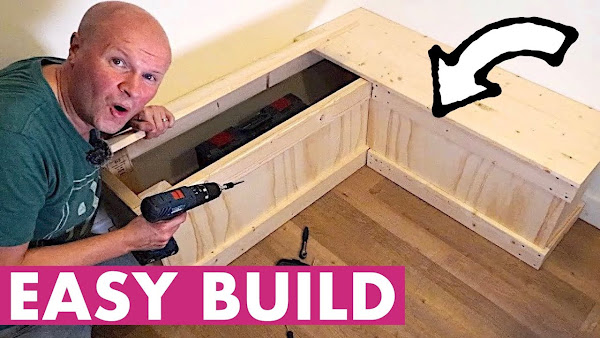
I FINALLY get the sides onto my homemade L-shaped corner bench. It's an L shape seat for the kitchen, but I only built the frame. In this video I show you how to put wooden sides onto the corner seating for a dining table.
I say it's finished, but I still need to varnish it and make a padded seat cover...
HOW TO BUILD AN L SHAPE CORNER BENCH: https://youtu.be/fapWGkXWyD0
BUY A BOSCH DRILL HERE! (As Amazon Associate I earn from qualifying purchases)
EPIC L-shape bench sides! Corner seat for kitchen FINISHED
TRANSCRIPT: (CLICK PLAY ON THE VIDEO ABOVE)
THIS IS THE TRANSCRIPT - CLICK PLAY ON THE VIDEO ABOVE!
Hello, are you looking to fill some dead space like the corner of this room in our kitchen?
Maybe get some seats or a bench in there like this!
And, even better, turn that bench into some useful storage?
Plus do it extremely budget friendly?
Well welcome back to part two of my L-shaped bench project.
This is sort of how it's looking now but in the last video I showed how I built this L-shaped bench using wooden stud work to fill the corner of our kitchen.
There's a link down in the description if you're interested in that, but it's now part two on the Dad delivers vlog where I try something new every day to make my family happy.
You know how hard that is but I think I’m making everyone happy with this corner bench.
This is more like one of my DIY vlogs but I’ve kind of left that video unfinished because as you can see I’ve got the sides not covered up.
So if we were to use it for storage everything would sort of fall out the edges.
So today this morning I went to my favourite place on earth - not really - somewhere that I seem to be going a lot.
It's another DIY superstore.
This one happens to be B&Q and I wanted to find some plywood.
I thought if I got some thick plywood I could use that to put the sides on.
It's one of these and I think I found my perfect piece of wood but as you can see it is absolutely massive!
I couldn't get that into the car even if I tried.
And I decided to use their cutting service so I planned it all out I’ve got all my dimensions on my bit of paper but first I had to get the right piece of wood!
And I saw lots of reviews online saying this wood falls apart and it's warped but actually I thought it looked great.
I just knew that the top two sheets were warped.
They looked really bent so I had to get a sheet from underneath.
I think on the footage here you can see me getting the sheet that's three sheets down - that looks fairly new.
But the only way I could get it out was by doing that magic trick you know where they pull the tablecloth off the table and leave everything standing?
Well I thought if I whipped out this giant sheet of plywood fast enough I’d be able to get it out.
But I think the footage shows quite clearly that that wasn't the best plan.
But still I tried I kept pulling tugging.
Finally after a lot of jimmying and walking around this... this truck that was left in front of it... I gave it one last push.
Managed to get it out so now I can get it over to the cutting service area.
Okay I’ve got the wood - time to get it cut now just over here!
And this is the cutting area. I don't like filming people when they're at work. It's bad enough when I do it on myself, let alone dragging other people into it, but I just wanted to show you sort of how it works.
So got it cut. Looks perfect look at it! Just what I wanted, all those. Just go to the checkout now.
I took my dad along we went shopping as well so we loaded it all up into the back of the car. Got the plywood back to the house. Now I won't need all of these bits because some of these bits are destined for the other corner of the room.
I’m going to do some shelves for the TV area that's going to be on... on the next video.
Just check with the spirit level?
Spot on!
But first I need to use these ones. These planks here that they very kindly cut up.
I hope I’ve got the measurements right. I’ve not checked it yet, I thought I’d do it on camera and share... share the joy with you.
Let me show you the basic idea.
I’m gonna hopefully - if I’ve got the measurements right - it should slot into there so all I need to do is cut the right lengths.
But let's... let's just slide it in, just to see.
Please work, please work.
Oh looks really tight... oh that's really snug, is it gonna work?
Oh yeah! Does it go in? It does look at that! Great! So all I need to do now is to cut these to length and then figure out a way to secure them... screw them in somehow from behind.
The... the wall isn't true so that's not a true L shape unfortunately.
I think I’m going to have some gaps.
That gap there isn't my dodgy measurements, that is literally how the wall meets.
It kind of comes out a bit. I managed to get four pieces cut from the board. I can only use one side because it's got this printing on it, and that one's a bit scratched.
I think I did that in the car.
This one has a load of filler in it.
This one looks okay and this one looks okay. Whoa!
I’m gonna use these two for the big parts - the long parts on the bench.
It's the first of August, it's the middle of summer and it has just started raining, so I’m going to try and get this done as quickly as possible.
One of them: I don't have to cut at all. I’m just going to run that the whole length, so if I can choose that one I think I’m going to... that's a hard choice. I think I’m going to keep this one so get that out of the rain.
Which means I need to make this one 79.2 cm long.
I really do not want to mark these pieces of wood so I’m laying out the dog blanket on our IKEA Seglaro table, just to keep it scratch free!
I know I should probably varnish it and protect it.
I’ll probably do that later on, but let's just cut it to length now.
I’m using my jigsaw and I’m trying to guide it as straight as possible.
Which is a bit tricky in the drizzle but I’m sure I can get it through there.
Casper's got his friend over!
And now I’m going to cut this piece into smaller pieces.
These will go onto the sides - onto the ends of the L-shaped bench to stop all my stuff falling out.
I’m on a bit of a wing and a prayer with these measurements because I’ve got to keep the jigsaw straight!
Hoping the chair would catch that!
Let's go and get these onto the bench.
So I’ve put one loose on already.
I want this to go on the end here.
Yes! Oh that is really satisfying.
I think that looks really good and then I’ll push this one up a bit, so that it's flush.
There like that. Completely flush. I just need to work out a way now to fix these to the bench so they don't fall off.
To permanently fix the sides onto the frames of the benches, I’m using these L-shaped metal brackets and I can't help feeling like this isn't the best or the prettiest way of fixing them on.
It is really difficult finding places to... to screw.
I can't get my screwdriver into these tiny places so I’ve got to find the right brackets and the right screwdrivers to try and get in here. So I’ve got a bit of a gap here, but it's a bit unavoidable. I think that's the closest I can get and when the lids are on... let's put the lids on... there! Finally, I got the sides on and... and oh I could do this.
Put it away and never see it again!
I’m calling this a Dad Delivers success! High five! Thank you so much for the thumbs up and the subscribes, I really appreciate it... it really helps me to keep these videos going. Videos like this that YouTube knows you're gonna love next!
Can you please help my daddy get 10000 subscribers. Just click on his face! Thanks bye! Alright this is going to be the proper one, right?
Previous post...
Gift ideas for men - boyfriend, friend, brother, husband, dad, teacher - presents for him
All about me, and getting these by email.
No comments:
Post a Comment
Hi, thanks for leaving a comment - I really appreciate it!